Where
to Start!
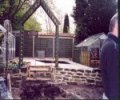
Two volunteers and an overgrown garden measuring 54ft
x 27ft that had had very little work done to it for about 18 years.
To make
the task easier it was decided to split the garden into two and to finish the
area behind the garage ( 22ft x 24ft ) before starting
on the side area.
The digging and clearing of the weeds began. It soon became clear that this
area was full of boulders and after talking to our neighbour found out that the
previous owner had
demolished a stone wall and had then buried it in the
back garden!!! After a couple of days of back breaking digging the site was clear
of weeds but there was a huge pile of stone walling.
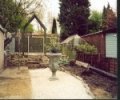
So, what to do with
the stone? Build another wall! After a crash course in wall building, this is
a trowel, sand, cement and stone etc, we began to build a wall across the garden
with a couple of steps in the middle. This gives a pleasing effect of a two tier
garden.
A 12ft x 8ft greenhouse was erected on the left side but what to do
with the rest? I wanted a few fruit trees but decided the area was not large enough.
Then my wife came up with a brilliant idea? Build a pond.Push off I said ( honest
) but after a bit of thought agreed.
After measuring we found that a
10ft x 8ft pond would fit in well with stone flagging around it and a small patio
in front. But how deep? As I wanted to keep goldfish and not koi it was decided
to dig the pond to a depth of 2ft with a 3ft deep area at the back.
And so
to work. The rest of the garden had now to be dug over and weeded so the soil
from the pond could be spread out over that area. After the area had been dug
a layer of weed repressing membrane was laid andthe pond liner laid over this.
To calculate the amount of liner required - length plus twice the depth by width
plus twice the depth , plus the overhang.
Large stones were placed on the
overhang to hold the liner tight and in place. Try to remove as many creases as
possible.
The pond was then filled with water. If you have a water meter
installed
it is easy to find out the capacity of the pond ( for future treatments
) but it is easy to calculate if required.
The rose arch was then assembled
and put in place.
Paving slabs were then laid on sand around the pond ensuring
they were all level and at the same height. ( use a long spirit level ) The slabs
overhung the pond by approx. 6 inches. Any odd shapes were cut using a hired stone
cutter which was a lot easier than using a hammer and chisel. Try to keep your
legs away from the blade otherwise it may become very bloody! The slabs were then
cemented into place.
The water was then lowered to below the pond ledge and
the gap between the overhanging slabs and the liner was then back filled with
cement. After the cement had aged a pond sealant was applied to the
back fill
and the overhanging slabs. When the sealant had cured the water level was topped
up.
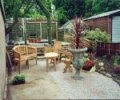
The rest of the garden was then planted and a stone chipping path was
laid down the middle.Goldfish and plants
were added to the pond and all seem
to be thriving well.
A large urn was bought, placed in the centre of the path
and planted up. Garden furniture was then bought and used throughout the summer.
A trellis was later built on top of the wall because of the danger of falling
off |